
I know, I know, I’ve not posted anything for ages, and for my New Years resolution I’m really going to try harder. I’m just so darn busy with work… and more work. I’ve undertaken a project that is really sucking all my time right now, but it could be my escape strategy to help get me to a position when I can do work that I really enjoy, and not just work that pays the bills.
Anyway, it’s Christmas 2024 and that means “CHRISTMAS PROJECT”.
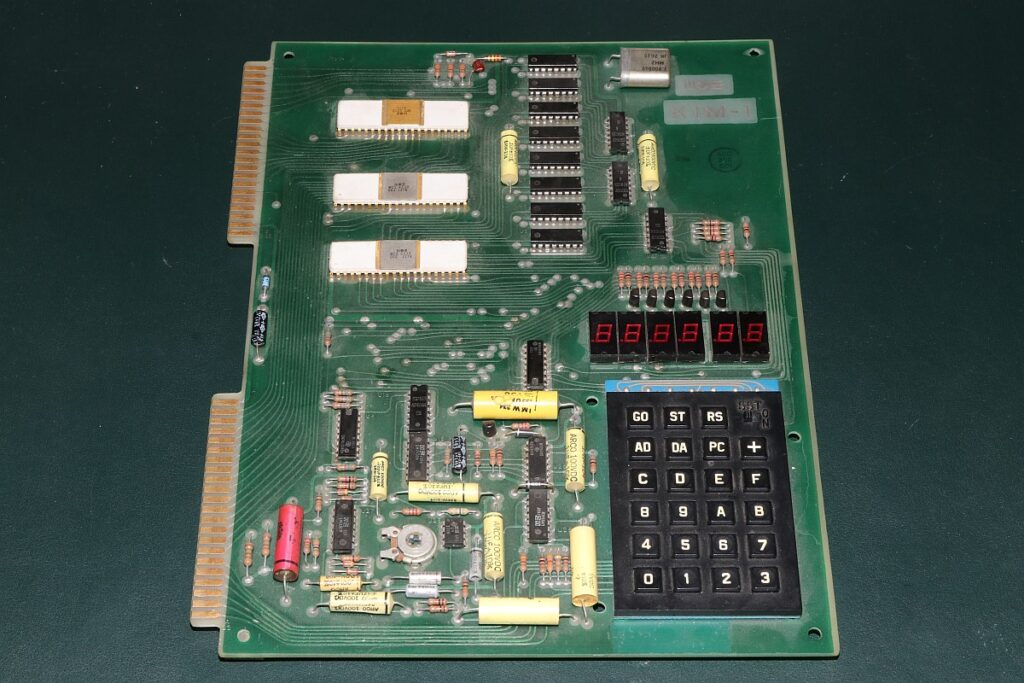
The above picture is of an original KIM 1, single board computer. It dates from the 1970’s and when I started seeing these advertised for sale in the electronic magazines I wanted one. It has 1K of RAM (plus another 128 bytes of RAM), 2K of ROM, a 6 digit LED display and a small keypad. It also has a cassette interface for saving/loading your programs on cassette tape, and a 6502 CPU running at 1MHz with two expansion connectors… and that’s it.
Have I mentioned I wanted one… I wanted one sooo badly it hurt. I can’t remember the original price, but it may as well have been a billion pounds because as a kid on pocket money, there was no way I was ever going to be able to get one.
Fast forward to a couple of weeks ago and two things happened. A friend was gifted one of these beauties, and a search on Ebay listed a couple for sale at around $1,500 US dollars each. Once import duty, postage, customs duty, repairs, expensive replacement components and everything else is applied, there won’t be any change out of £1,500 UK pounds. Not fair… I’m an adult… and I want one… NOW….
However, on Ebay there was also a listing for a bare KIM1 PCB, which I pounced on. I’ll just assemble one myself. I’m a skilled electronics engineer… how hard can it be. Actually, the assembly part is pretty easy… getting hold of the components is another story.
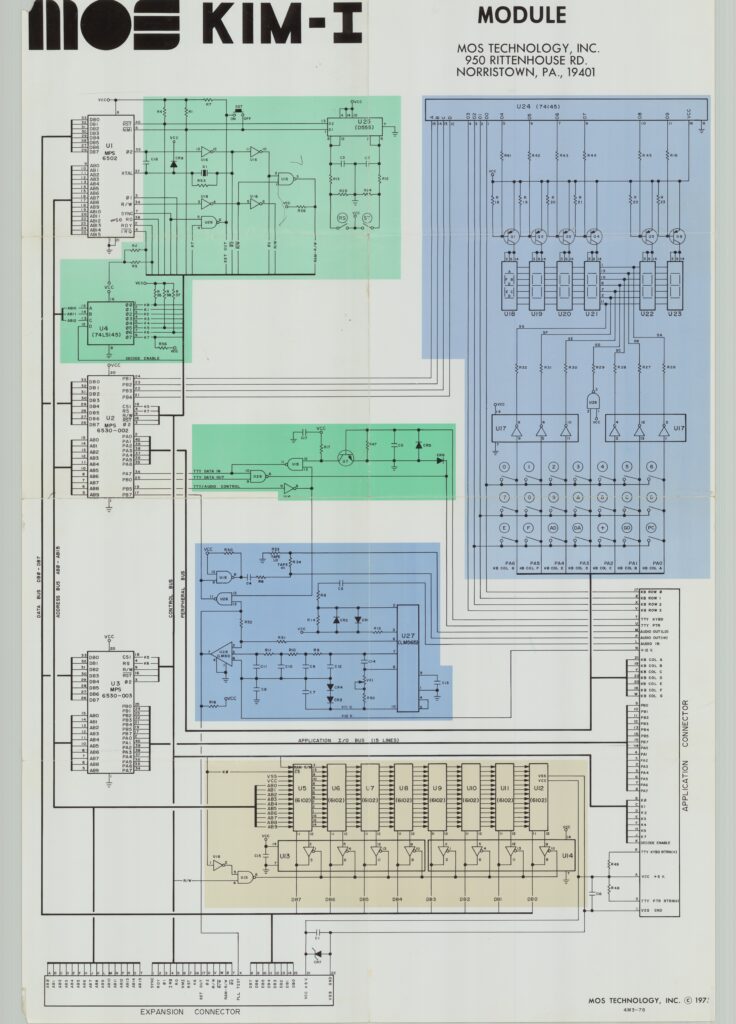
A quick look at the above circuit diagram shows there’s not really that much to the KIM 1.
The 6502 CPU is pretty common as it was used in a lot of home computers from the 1970’s and 1980’s and they are reasonably easy to find. I had several in my parts drawer so no problem there.
The 1K of memory (8 x 6102 chips) are much harder to find. However, as luck would have it, the 2102 memory chip is a plug-in replacement and I happen to have a bag full of them (thanks to my late brother being another hoarder). This was going to be easy.
Now I’m pretty familiar with these legacy computer systems and they always follow the same basic pattern. A CPU of some sort, Memory (SRAM or DRAM), ROM (and this can nearly always easily be an EPROM or sometimes even an EEPROM), I/O of some type (sometimes a dedicated IC like a VIA or just a couple of jellybean TTL chips like 74LS245’s), and if you’re lucky, a display (one of those old LED bubble calculator displays or just a set of common 7-segment digits) and keypad (20 odd cheap and nasty PCB switches arranged in a matrix of some type). The first thing that struck me about the KIM1 circuit was the ROM… or lack of one. It turns out that the 6530 I/O chips are multi-functional. They contain a couple of 8 bit I/O ports, 64 bytes of RAM and 1K of mask ROM that stores the monitor firmware, and now it suddenly get’s complicated and expensive. Those 6530 chips are very rare, and even if I could find some, I don’t have the tools to program the mask ROM inside of them. The firmware for the KIM1 is 2K in size, so half the firmware is programmed into each of the two chips.
Luckily there is a design for a plug-in PCB module that has two 6532 chips (these are almost the same as the 6530’s but have 128 bytes of RAM instead of 64 bytes, and no mask ROM). The plug-in PCB has provision for a separate ROM and the additional decode logic needed to glue everything together and these 6530’s are available (sort of)… Things were looking up. The rest of the components looked like common enough and I probably had those in the junk box, so I decided to buy the blank PCB, and would just pick up the rest of the components I needed.
What could possibly go wrong.
Whilst looking around for sources of some of the components I stumbled across the Gerber files (these are the files that you need to send to a PCB manufacturer for them to create a blank PCB) for the KIM1. I grabbed a copy of these files as an idea was forming. I also found the Gerber’s for the plug-in PCB module, so grabbed a copy of those. I couldn’t find a design for a keypad, but the circuit diagram is published in the KIM1 documentation, so I could easily design my own keypad from that and making use of the PCB switches I already had.
It’s worth mentioning that these home computer kits from the 70’s and 80’s are nothing like the home or personal computers of today. The manufacturer would supply the computer (or a kit in many cases), but they would also supply all the documentation including circuit diagrams, programming manuals, user manuals and quite often even a properly commented program listing of the monitor firmware. They didn’t hide things from the end user and they certainly didn’t go around grinding off the part numbers from components. They wanted the user to understand everything about the computer, to be able to expand it, repair it, experiment and learn. These really were the “good old days” of personal computing.
Back to the KIM1. The computer needs a 1MHz crystal and these used to be common as anything, but not anymore. A couple of suppliers do sell them but they are really expensive. After a lot of hunting around I managed to find limited quantities at a fairly reasonable price. I grabbed a bunch of them.
I found the 6532’s for sale from a company in New Zealand, so grabbed a bunch of chips from them. The KIM1 also needs an LM565 PLL chip which I’ve never heard of and seemed to be unobtainable. However, Google to the rescue and I found a supply in Germany. I grabbed some chips from them.
The displays are a little strange in their pinout but a UK company sells compatible ones and so I grabbed a number from them.
I had all the TTL chips with the exception of the 7406 but again, a surplus supplier in the UK had them in stock. They also had stocks of the 2102 RAM chips at a reasonable price, so I picked up a quantity from them whilst I’m at it (may as well as I was paying for postage anyway).
The resistors are all common enough and I had those, the only parts remaining were the axial capacitors. The KIM1 uses axial capacitors exclusively (bar one) and I have very few of them in my parts box, and none of those were the correct values for the KIM1. In my opinion these felt like the most expensive parts to purchase new. Some of the capacitors had a line price of £2 each. Whilst I tried to keep things as authentic as possible, the costs were now mounting up. Capacitor technology has moved on a lot in 40 years. For some reason, Commodore chose to use, for example, some 250v working voltage capacitors where 10v would have been more than acceptable, and these 250v are physically large. For effect, I tried to pick capacitors that would be a similar size to the originals, but high voltage capacitors are expensive, so in some cases I went for some capacitors that were electrically compatible rather than physically similar, but the end result is acceptable I think.
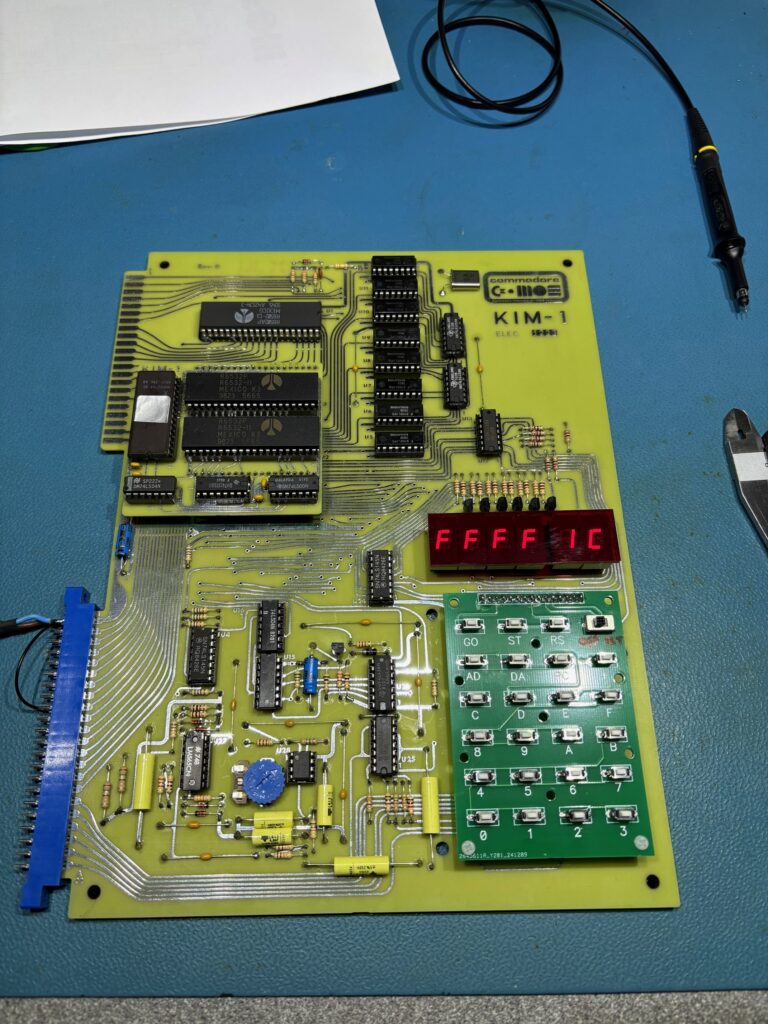
Above is an image of my KIM1 computer.
If you compare mine with the original, you can see mine appears to have fewer of the large yellow capacitors. Well the capacitors are there of course, they are just a LOT smaller.
You can clearly see the plug-in PCB (top-left) that contains the two 6532’s and ROM chips, and my version of the keypad (which I’ve now replaced with a much nicer one).
So there you have it, a working KIM1 computer, for a fraction of the price of an original, second-hand one. But that’s not quite the end of the story.
I said earlier that I had downloaded the Gerber files for the KIM1 PCBs. As luck would have it, I needed to order PCBs for a work project, so added in the KIM1 PCBs to the same order (again, you save on postage if you do this).
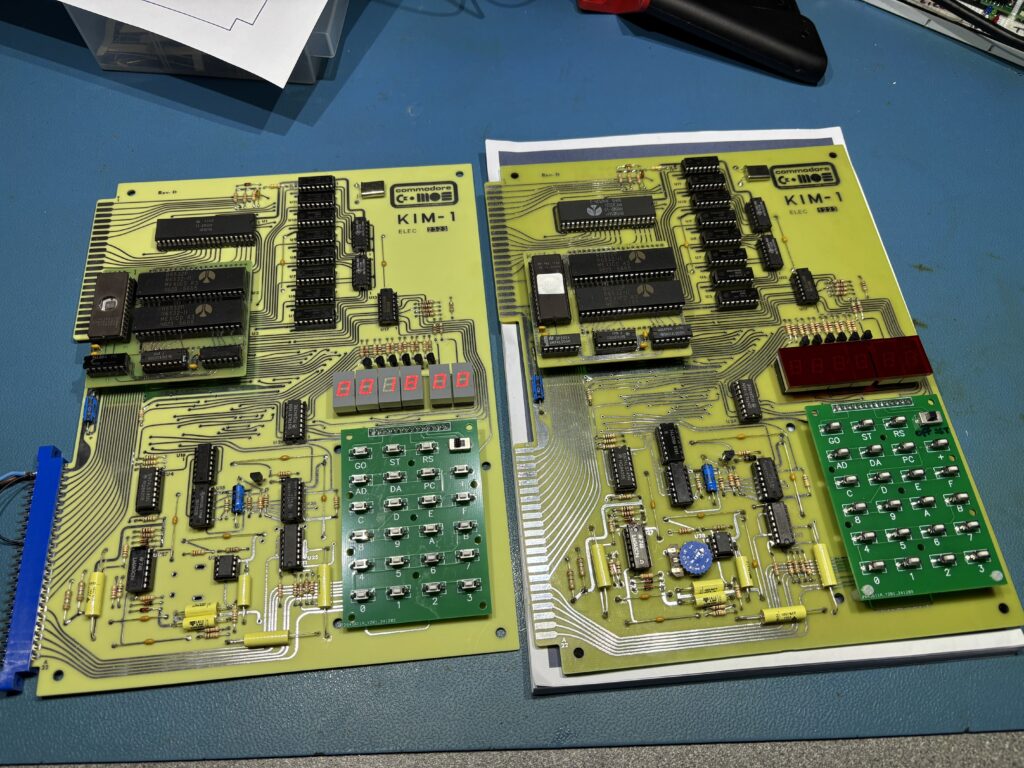
The PCBs arrived… and then there were two… (the one on the left is missing the POT needed for the cassette interface but is fully functional in all other respects.).
Why two KIM1’s I hear you scream?
Come on… be honest… you want one… don’t you ?
Because next, I went to five 🙂
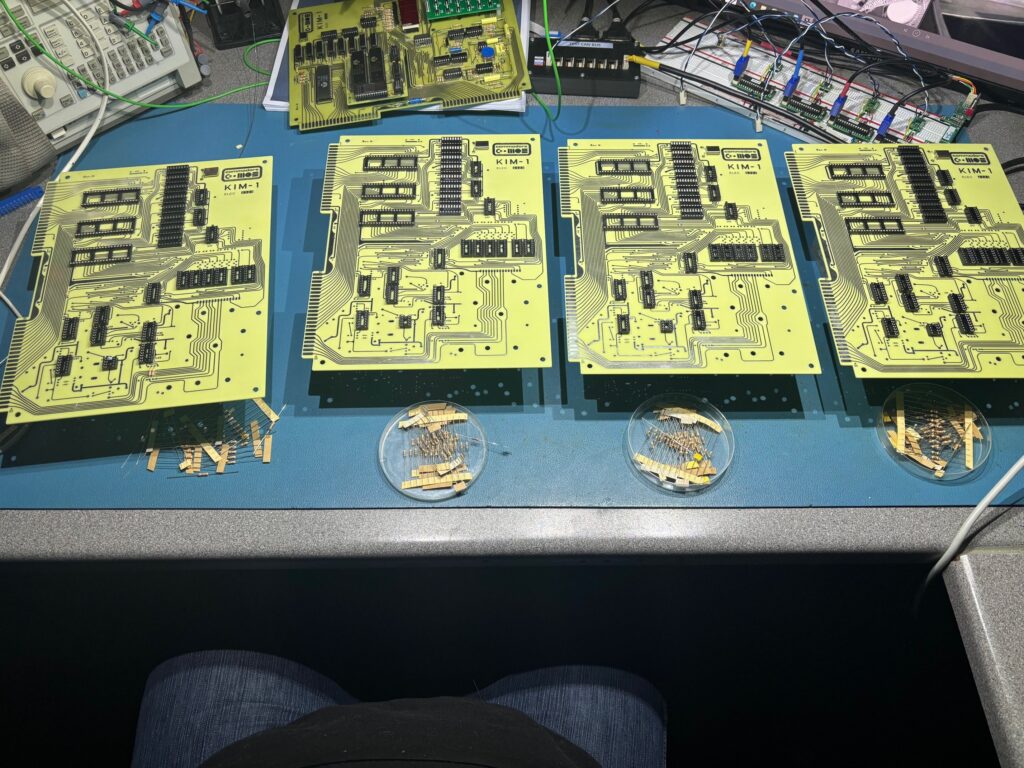
The above image shows me assembling the remaining four PCBs, production line style. In case you are wondering why five boards in total, because JLCPCB always supply a minimum of five PCB’s in a batch.
I’m waiting on parts to complete these last four boards (plus a POT for the 5th), but at the end I will have six KIM1 boards, fully working (hopefully).
I’m going to keep one of them for me of course, but the other five I’m going to sell. The plan is to recoup the costs so that mine works out cost neutral.
Now, I struggled a little bit get the KIM1 actually working. Everything you need is documented in the manuals, but it’s not as clear as I’d like, and whilst I’m OK soldering up audio and power leads and have bench PSUs that can supply +12v and +5v etc, many people don’t. So I decided I would assemble everything in a complete kit that would include:
- Fully assembled and working KIM1 computer
- UK mains power supply unit
- +5v and +12v power board (the KIM needs +12v for the cassette interface)
- An edge connector plus leads with 3.5mm jacks on for connection to a cassette recorder for program storage, power connections, switch and cables for connection to a dumb terminal/PC serial port (running a terminal emulator possibly)
- Three printed manuals (6502 software, 6502 hardware and the KIM1 user manual)
- Printed copy of the KIM1 circuit diagram
- A couple of spare edge connectors so you can experiment
- Anything else I can think of that’s useful
All the IC’s and seven-segment displays are in IC sockets to make repairs simpler, and the plug-in PCB that holds the 2 x 6532’s can easily be removed and original 6530’s (if you can get them) can be plugged in.
The keypad is also on a connector so it can be removed and replaced with a different type if desired; actually the KIM1 brings all the signals to one of the edge connectors so you can connect an external keypad/display here if you like.
I’ve got some plans to build some add-ons. I’ve got a supply of 3-channal sound generator chips (the same as used in the BBC Micro) so I think an audio board would be nice. Also, after playing with the KIM1 for a couple of hours I think either replacement monitor firmware, or some type of extension firmware would be a useful thing. You wouldn’t believe the hoops you have to jump through to save/load programs from cassette, and whilst I’m at it, a better way of saving/loading programs that doesn’t need cassette tape would probably be useful too.
Anyway, when everything is assembled I’ll add a link here to an Ebay listing. However, if anybody is interested and wants to move to the top of the list, drop me a line. For now, I’m not intending to ship these outside of the UK. The import duties into another country would be pretty high I think. The current price for the complete kit as described above will be £500 (this may change if UK customs sting me for some of the additional parts I’ve had to purchase from strange and foreign lands). Let me know if you’re interested.
It’s the 31st December today, so I hope everybody who celebrated it had a good Christmas and has a happy New Year.
Leave a Reply
You must be logged in to post a comment.