
So the Christmas break is over and it’s back to the grind. I did however manage to get most of my KIM-1 activities completed.
I’ve now got seven KIM-1 machines in various states of completeness and am just waiting on parts to arrive from the four corners of the globe.
The original machine is fully built and is, as far as I know, also fully working. Yesterday I managed to build a 20mA current loop to RS232 converter and eventually get the KIM-1 talking to a terminal emulator running on my PC.
I struggled with this interface for over a day as there are several variables that need to be considered when getting everything connected, but the one variable I didn’t consider (and this is the one that caused all the problems) was that Q7 (an NPN transistor on the KIM mainboard) was faulty. Whilst not a brand new transistor, it was from my stock and was unused, so I’ve no idea how it got damaged. Anyway, I pulled another one from the same bag and that tested fine, so installed it and hey-presto, we have serial communications working.
A couple of things worth mentioning to anybody trying to get the KIM-1 communicating with a dumb terminal or terminal emulator.
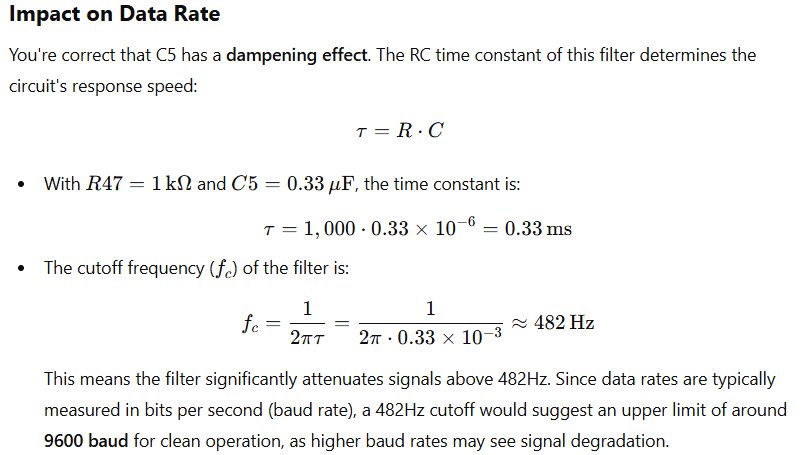
Whilst I’ve not tested this fully, the KIM-1 is happy to communicate up to 4800 Baud. 20 Baud seems to be about the lowest (and it’s pretty unusable at that speed to honest). There are no settings on the KIM-1 that need to be adjusted as it figures out the Baud rate on it’s own. There is a capacitor C5 (0.33uF) on the KIM-1 acting as a low pass filter but this has a dampening affect on the serial input data stream and places a hardware limit on the maximum speed that the serial interface can operate at. I had a conversation with ChatGPT about it and it threw out this:
There is no mention in the documentation (that I can see anyway) where it says what the minimum/maximum Baud rates supported are. It talks about teleprinters which are inherently slow (40 to 110 Baud) so I’d started at 60 Baud initially. I stumbled across a YouTube video where I saw them successfully getting the serial interface working and the setting was 2400 Baud, so I used that until I got everything working.
When you establish the serial connection and reboot the KIM-1 (and you have the wire link in place that indicates that the TTY connection is to be used), you need to press the “Delete” key on the PC keyboard. This sends an ASCII code that the KIM-1 is looking for and helps it automatically determine the Baud rate. The KIM-1 documentation also makes reference to a special key:

It turns out that this is the “decimal point” or “full stop” key. If you want to be able to update KIM1 memory locations, you will need to know this.. don’t be like me who didn’t know this, and spend an enjoyable hour or so digging though the KIM-1 monitor source code to figure out what was going on.
Anyway, as I fully test each of the KIM-1 machines I will also test the serial interface and make sure that Q7 is ok.
The only thing left to do is test the cassette interface, which is proving rather difficult… mainly because I don’t have a working cassette recorder. Yes, I know, I can use an MP3 recorder, or even the audio input on a PC, but I need to prove it will work with a cassette recorder. What people eventually decide to use is up to them, but I don’t want to deal with earth loops or electrical mains noise issues. I just want to be able to prove the cassette interface works.
Ebay to the rescue and I bought a cheap cassette recorder… faulty of course (I’m not going to make this easy for myself… am I… duhhh)
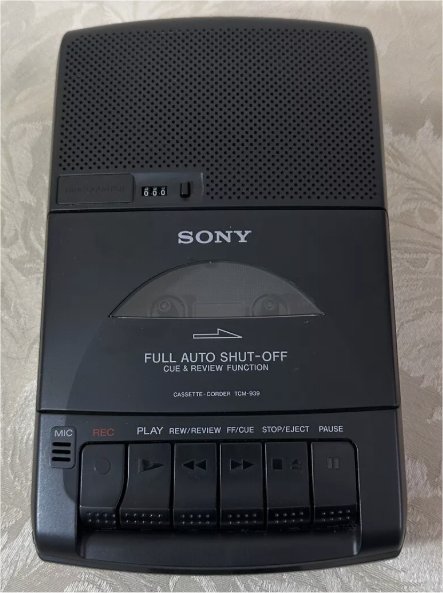
To be fair, it was sold as not working and I wasn’t disappointed. I picked this one because it was cheap; £15 delivered, and it’s a Sony with the full service manual available for download.
It arrived yesterday and after opening it up, the fault was obvious; the drive belts have all perished.
For those in the UK, Amazon sell a large set of different size belts: OTOTEC 112PCS 1MM Recorder Rubber Belts Folded Length 40-190mm Mix Cassette Tape Machine Belt for Recorder CD-ROM Video Machines Walkman DVD Drive(2Sets): Amazon.co.uk: Electronics & Photo
There should be something in that lot (112 pieces) that will do the job. These will arrive today so hopefully I will then have a working cassette recorder and I can test the cassette interface.
Assuming that the interface does indeed work, that will be the original KIM-1 fully tested and operational. Next I need to test the second KIM-1 and make sure that it’s also fully operational.
At this point I will probably just wait for all the remaining parts to arrive, complete final assembly work and test each of the other four KIM-1s. I could transfer parts from a known working machine but that’s just inviting trouble I think.
After more research I abandoned getting the manuals printed by a 3rd party. It was going to be expensive and is just as easy for me to print and spiral bind them myself using my trusty Inkjet printer, which uses ink tanks not cartridges, has done a LOT of printing so far, still has plenty of ink, and ink bottle refills are much much cheaper than ink cartridges.
I’ve already printed a couple of complete sets of manuals and bound them with no issues, they look fine and have the advantage that they will lay flat at the page you want.
Yesterday I also sent several PCB designs to JLCPCB for some add on boards for the KIM-1.
Firstly there are two adapter boards that connect to the two 44 way ports on the KIM-1.
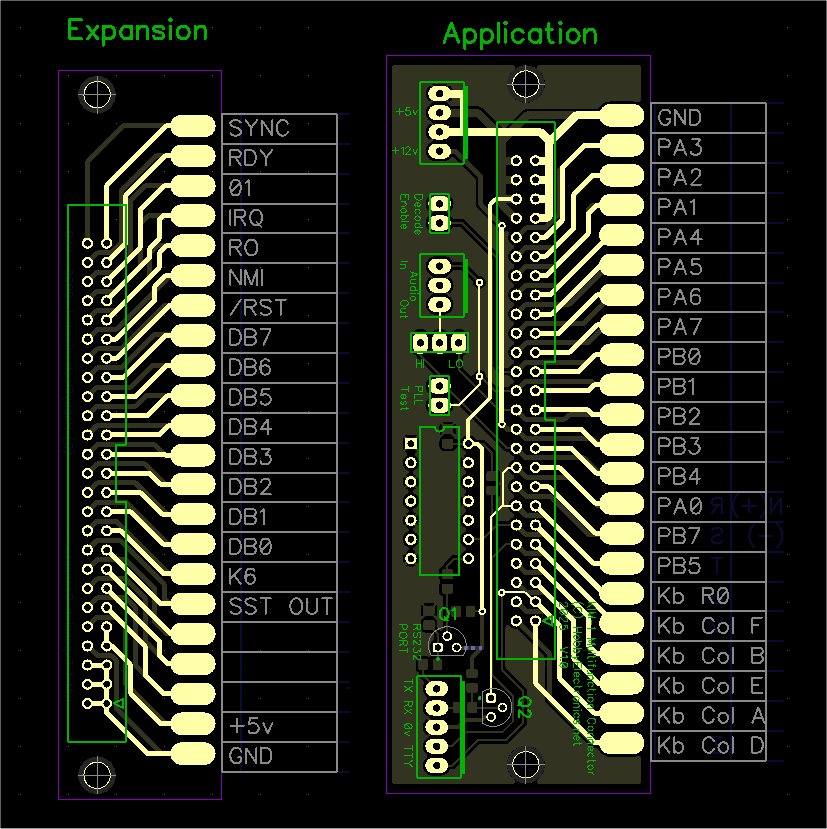
The PCB on the left allows a 50 way ribbon connector to be connected to the 44 way edge connector of the KIM-1 Expansion port. The idea is that a short ribbon cable can then be used to connect the KIM-1 Expansion port to a backplane.
The PCB on the right is the fun one. This plugs into the KIM-1 Application port and also allows a 50 way ribbon connector to be added to connect the KIM-1 Application port to a backplane, but it can also be used standalone and allows for power (+5v & +12v) to be supplied to the KIM-1, provision for connection to a cassette recorder audio input and output, a jumper to enable the PLL test, another jumper that enables/disables the KIM-1 onboard RAM (as described in the KIM-1 user manual), and it has an RS232 interface to 20mA current loop converter, meaning you can connect the KIM-1 to a PC or dumb terminal serial port.
The 3rd PCB is a PSU board.
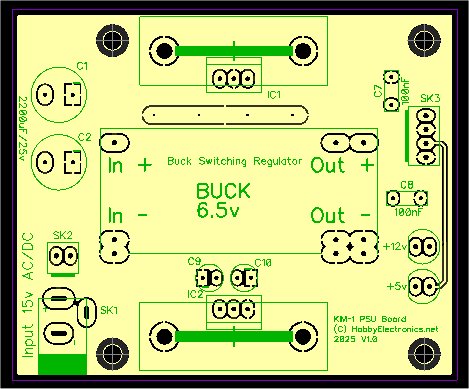
This PCB accepts 15v AC/DC (any polarity) input, and provides +12v and +5v for the KIM-1. A small cable connects this PSU board to the Application expansion PCB above. This PSU has been somewhat over engineered for safety. There is a switching buck converter that drops the incoming voltage to 6.5v, which is fed into a 5v LDO (Low Dropout) voltage regulator that in-turn supplies the 5v to the KIM-1. I opted for this arrangement to reduce the heat produced which would have required a much larger heatsink for the 5v regulator and would have pushed up costs considerably. I could have set the buck regulator to 5v and just used that as the 5v for the KIM-1, but the additional 5v regulator means that should anything go wrong with the buck regulator, the 5v regulator will act as the last line of defence against high voltage getting onto the KIM-1 PCB. In this type of fault condition, the regulator will quickly go into thermal overload shutdown. Anyway, the buck regulators are cheap, and large heatsinks for the 5v regulator (and it would need to be large as dropping 15v, or possibly 12v to 5v at 1 Amp produces a LOT of heat), are expensive and would require even more board space (which is expensive) and added a lot of weight, which is… well, just heavy. Basically using a buck switching regulator saves money.
The above PCBs will arrive in a couple of weeks (I opted for the slow boat from China shipping method as it’s cheaper than 3 day air freight), and it gives me time to complete the final assembly and testing of all the KIM1’s when the parts eventually show up.
Leave a Reply
You must be logged in to post a comment.